Smart gardeners stretch their plant budgets by selecting vigorous perennials that multiply on their own each season. These generous spreaders quickly fill empty garden beds with vibrant color and dense greenery without requiring constant repurchasing.
Naturalizing plants establish robust root systems or drop fertile seeds that return every spring with greater vigor. You can effortlessly transform barren soil into a lush, layered sanctuary by letting these resilient varieties do the heavy lifting.
These nine reliable low-maintenance perennials will steadily expand across your landscape, providing you with free blooms and effortless ground coverage year after year.
Tip #1: Hostas (Hosta)
Hostas rank among the most dependable perennials that multiply across shady borders. Their architectural foliage creates lush mounds that expand outward every single growing season.
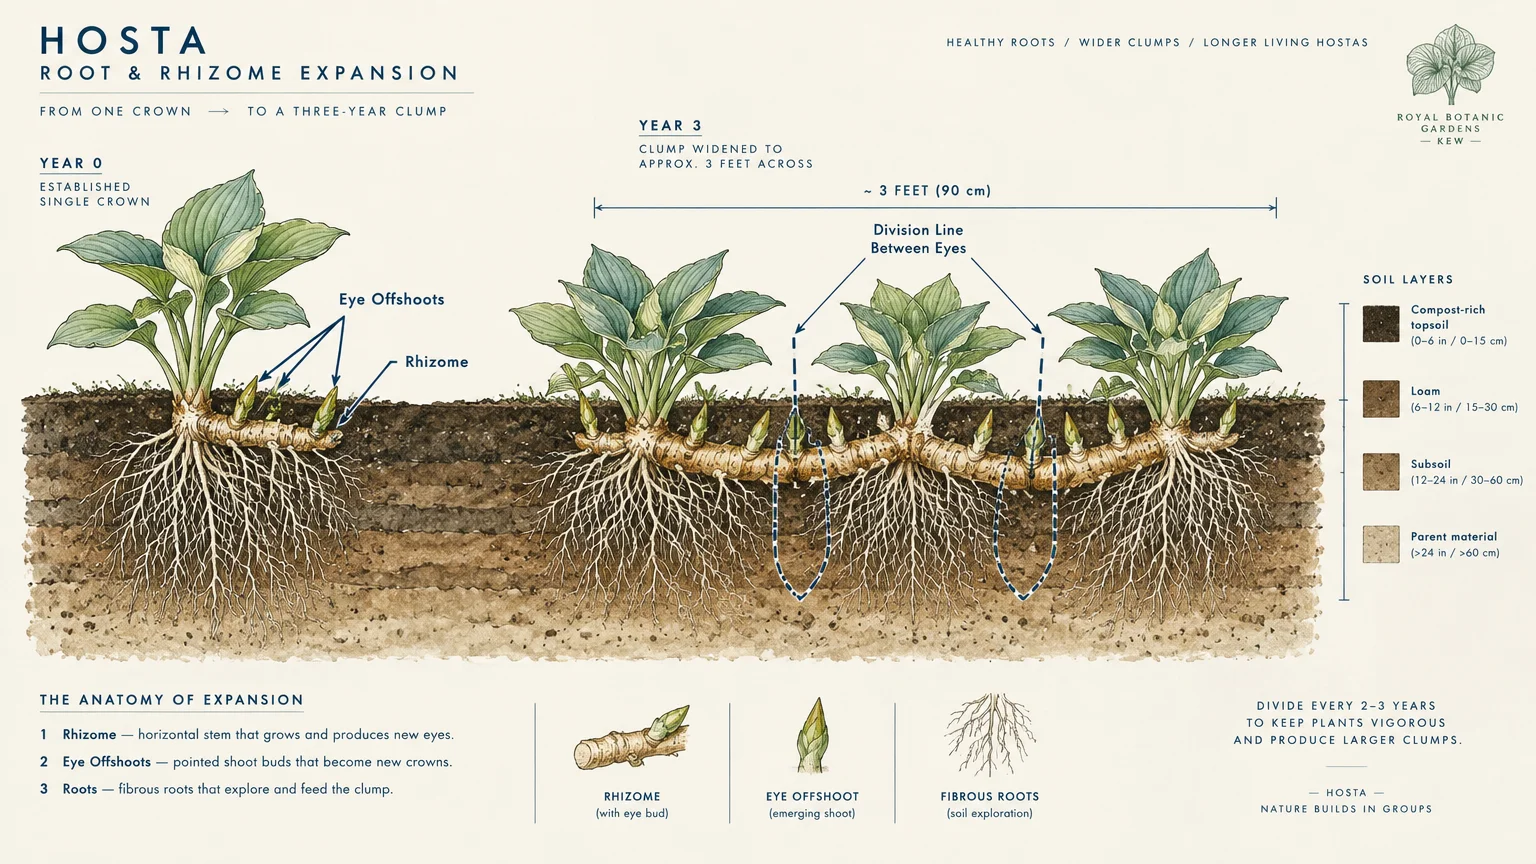
These shade lovers grow from fleshy underground rhizomes that produce distinct offshoots called eyes. Each emerging eye develops into a full clump of leaves, steadily widening the plant’s footprint over two or three years.
You should plant hostas in rich, moisture-retentive soil enriched with well-rotted organic matter. They perform best under dappled shade or gentle morning sun, where harsh afternoon rays will not scorch their leaves.
Once your hosta clump reaches three feet across, you can easily divide it in early spring. Simply dig up the root ball with a sharp spade and slice it between eyes to create several free specimens.
Hostas pair beautifully with delicate woodland companions like ferns and astilbes. Their broad textures smother weeds effectively, making them exceptional low-maintenance perennials for shaded borders.
Consistent soil moisture during the first year helps hostas anchor their thick roots deep beneath the topsoil. Once established, they withstand temporary summer dry spells with impressive resilience.
Tip #2: Black-Eyed Susan (Rudbeckia fulgida)
Black-eyed Susans bring golden warmth to late summer landscapes while spreading vigorously through self-seeding and underground stems. A single starter plant can quickly become a brilliant, glowing colony within a few years.
This North American native develops spreading rhizomes that push upward around the parent crown. Additionally, its seed heads drop dozens of viable seeds each autumn that sprout naturally when warm spring temperatures return.
Plant your black-eyed Susans in full sun and well-drained soil for maximum flower production. They tolerate summer heat and occasional drought with ease once their roots anchor deeply into the surrounding earth.
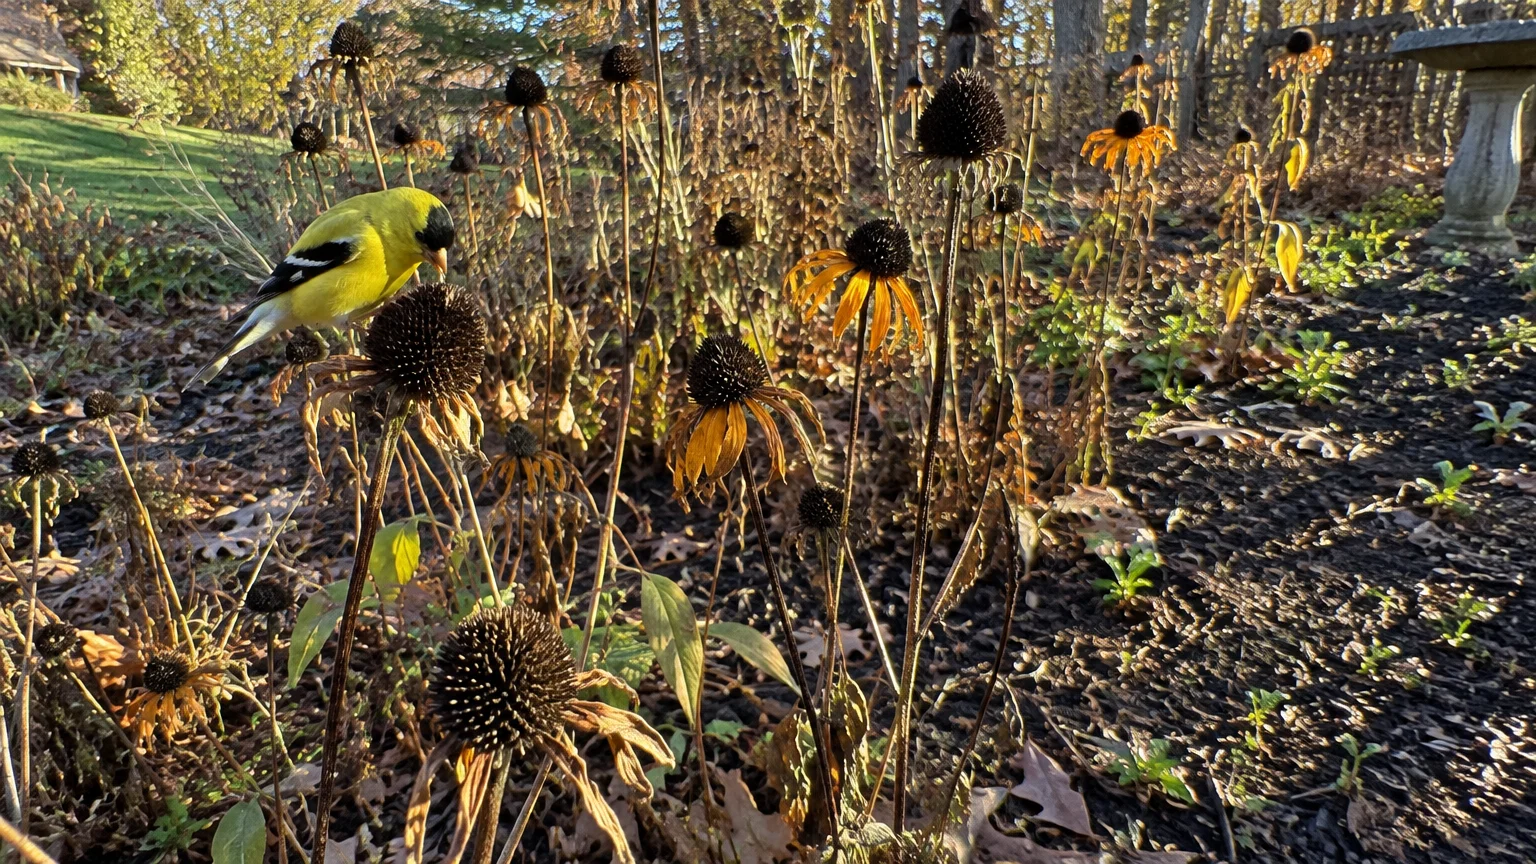
Leave the spent seed heads standing throughout winter to feed foraging songbirds like goldfinches. You will enjoy watching birds feast while letting nature reseed your borders with fresh seedlings.
If the patch becomes overcrowded after four years, lift the outer clumps during spring. Replant the vigorous divisions elsewhere or gift them to neighboring gardeners looking for sturdy summer color.
These tough wildflowers blend effortlessly with ornamental grasses and purple coneflowers in meadow gardens. Their sunny faces brighten the landscape from July until hard frosts shut down garden growth.
Tip #3: Purple Coneflower (Echinacea purpurea)
Purple coneflowers are iconic spreading garden flowers that reward you with daisy-like magenta petals and spiky copper cones. They thrive on neglect and readily establish thriving colonies in dry, sunny borders.
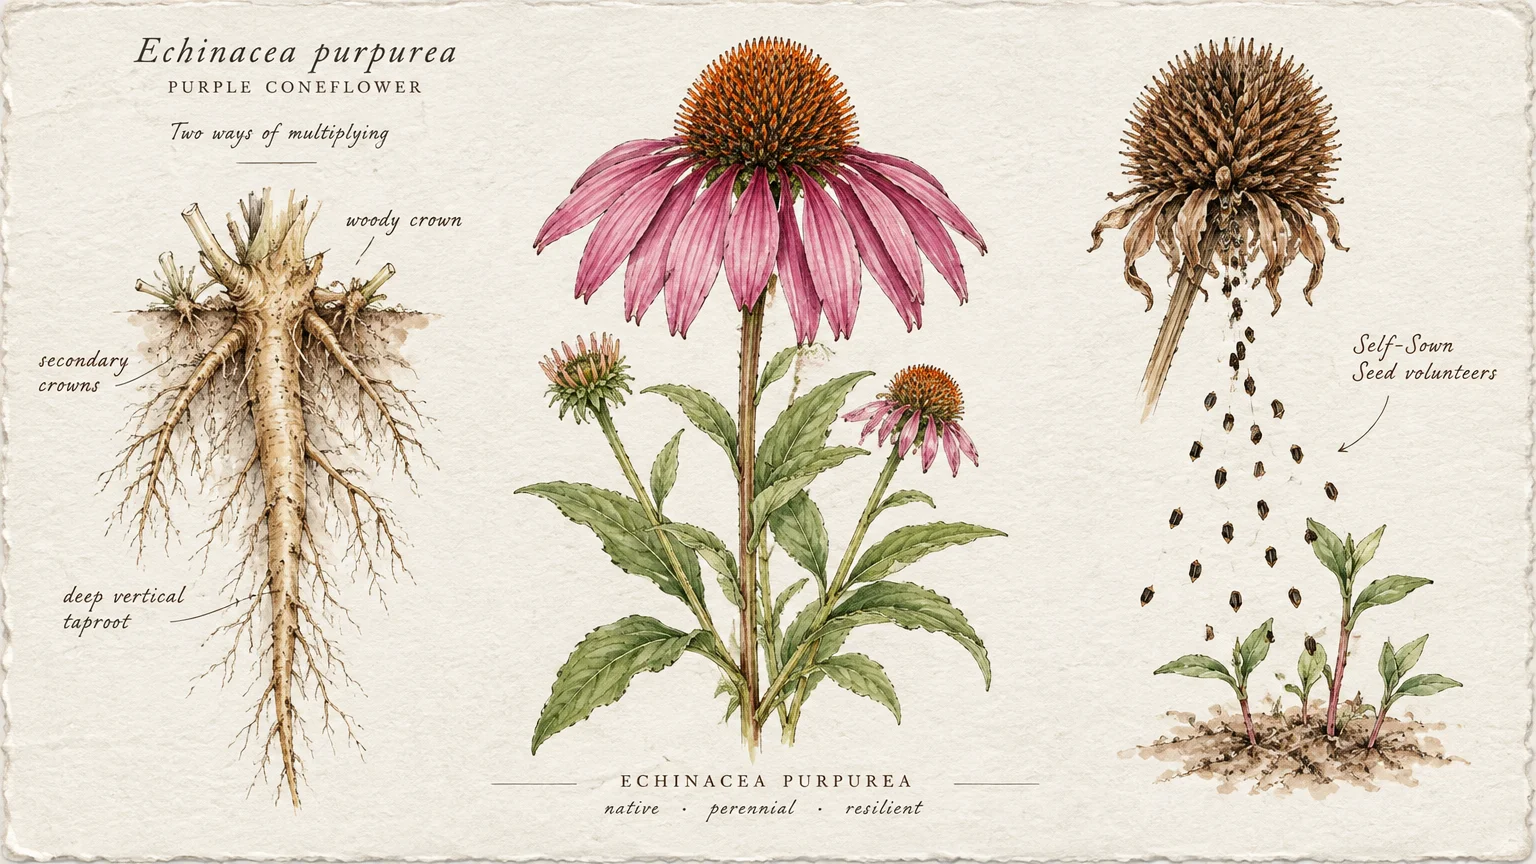
Coneflowers multiply in two distinct ways: by expanding their fibrous root crowns and through prolific self-sowing. Mature plants cast ripe seeds into surrounding mulch, producing sturdy young volunteers every spring.
Give coneflowers full sunlight and well-aerated soil that drains quickly after rainstorms. Heavy clay can cause crown rot, so amend sticky ground with compost or grit before planting your specimens.
To encourage naturalizing, skip late-season deadheading and allow the central cones to mature into dry, prickly capsules. Wind, birds, and rain will scatter these seeds across bare garden soil naturally.
Thin out dense clusters of seedlings in late spring so surviving plants have room to flourish. These rugged perennials attract native bees and butterflies, boosting your yard’s biodiversity with little effort.
Deep taproots allow mature coneflowers to survive intense heat waves and prolonged droughts without wilting. Because they resent root disturbance once established, allow seedlings to mature where they germinate whenever possible.
Tip #4: Creeping Phlox (Phlox subulata)
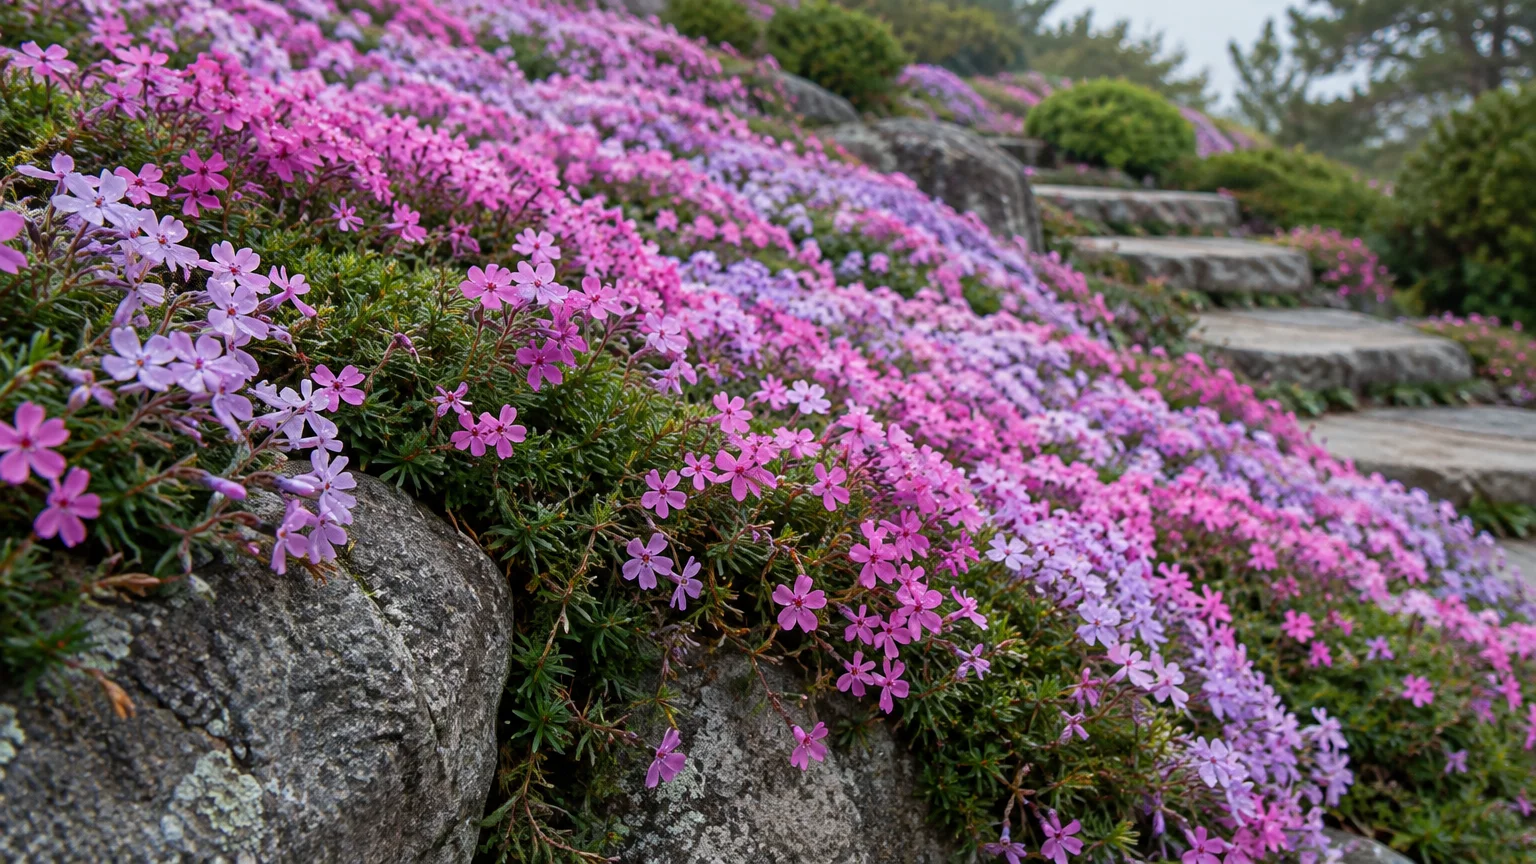
Creeping phlox blankets bare ground with a dense carpet of jewel-toned blossoms every April and May. Its needle-like evergreen foliage hugs rock walls and gentle slopes, multiplying outward with steady determination.
This low-growing perennial multiplies using creeping stolons that root wherever leaf nodes touch moist soil. As stems travel along the ground, they anchor firmly and establish independent root structures.
Position creeping phlox in full sun and sharply drained, slightly alkaline or neutral soil. It thrives in gritty rock gardens where excess rainwater drains away swiftly from tender stems.
Shear the entire carpet back by one-third immediately after flowering finishes in late spring. This trimming stimulates dense foliage growth, prevents woody stems, and encourages rapid horizontal expansion.
You can pin trailing stems to bare patches of soil using small landscape staples. Within weeks, those pinned nodes develop vigorous roots, quickly creating new daughter plants for your garden.
The dense evergreen foliage acts as a living mulch, suppressing summer weeds and protecting topsoil against wind erosion. It stays vibrant through winter, offering visual structure when other perennials have died back.
Tip #5: Daylilies (Hemerocallis)
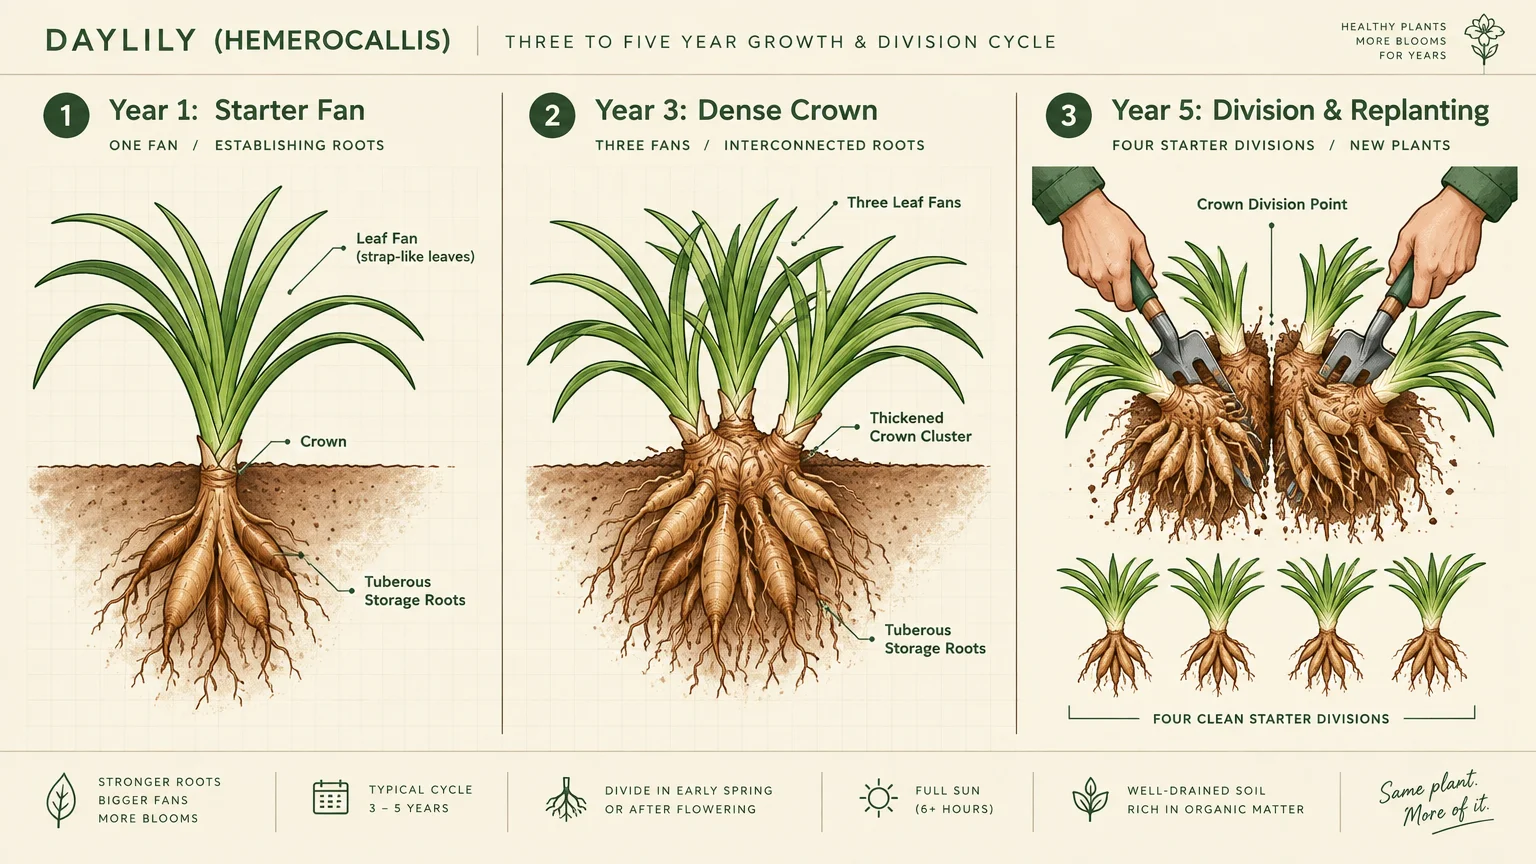
Daylilies are legendary for their tough constitutions, vibrant trumpet blooms, and remarkable ability to multiply underground. They form massive clumps that crowd out stubborn weeds and stabilize vulnerable sloping ground.
Daylilies propagate below ground through swollen, tuberous root systems that generate multiple growing fans. A single fan planted this spring can easily multiply into a dozen blooming fans within three seasons.
Plant daylilies in full sun to partial shade, providing at least six hours of direct light daily for maximum blossoms. They adapt to nearly any soil type, from sandy loam to heavy clay.
Divide overgrown daylily clumps in late summer after the main flush of flowering concludes. Lift the heavy root mass with a garden fork, shake away excess dirt, and tease fans apart with your hands.
Replant divided fans in groups of three for immediate visual impact across your landscape beds. Because daylilies require almost zero maintenance, you can plant them in distant corners without worrying about fussy care routines.
Reblooming varieties like Stella de Oro provide repeated flushes of flowers from June through September. Their vigorous clumping habit ensures a continuous supply of free divisions every few years.
Tip #6: Blanket Flower (Gaillardia aristata)
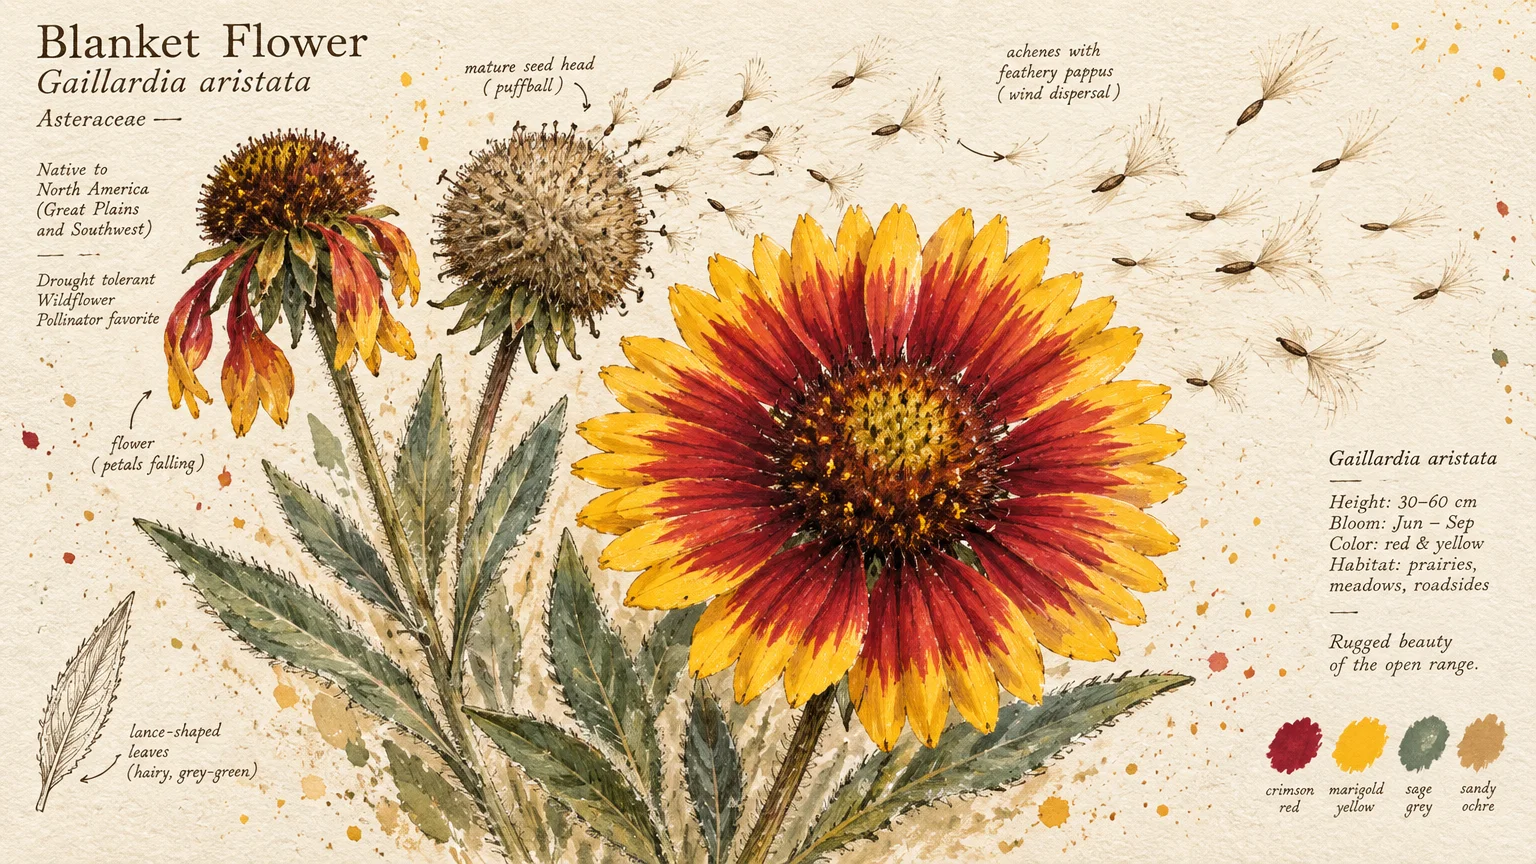
Blanket flowers provide dazzling displays of fiery red, orange, and yellow petals throughout the hottest summer months. These self-spreading perennials carpet open spaces rapidly through abundant seed production and expanding crowns.
Gaillardia produces round seed heads packed with wind-dispersed seeds that settle into nearby soil crevices. The seedlings emerge quickly in warm weather, often blooming during their very first year of growth.
Choose a planting site bathed in full sun with poor to moderately fertile, fast-draining soil. Rich, heavily fertilized soil actually weakens blanket flowers, causing floppy stems and shortening their natural lifespan.
Let the final flush of late-autumn blossoms form dried seed globes instead of deadheading them. Scratch the surface of neighboring soil lightly so drifting seeds make direct contact with the earth.
You will discover new seedlings scattered across your garden paths and gravel beds every spring. Transplant these energetic volunteers to sunny bare spots where you need immediate, drought-tolerant splashes of color.
Blanket flowers excel in xeriscapes and coastal gardens due to their extreme salt and drought tolerance. Once their taproots settle into sandy soil, they shrug off blistering summer heat without wilting.
Tip #7: Siberian Iris (Iris sibirica)
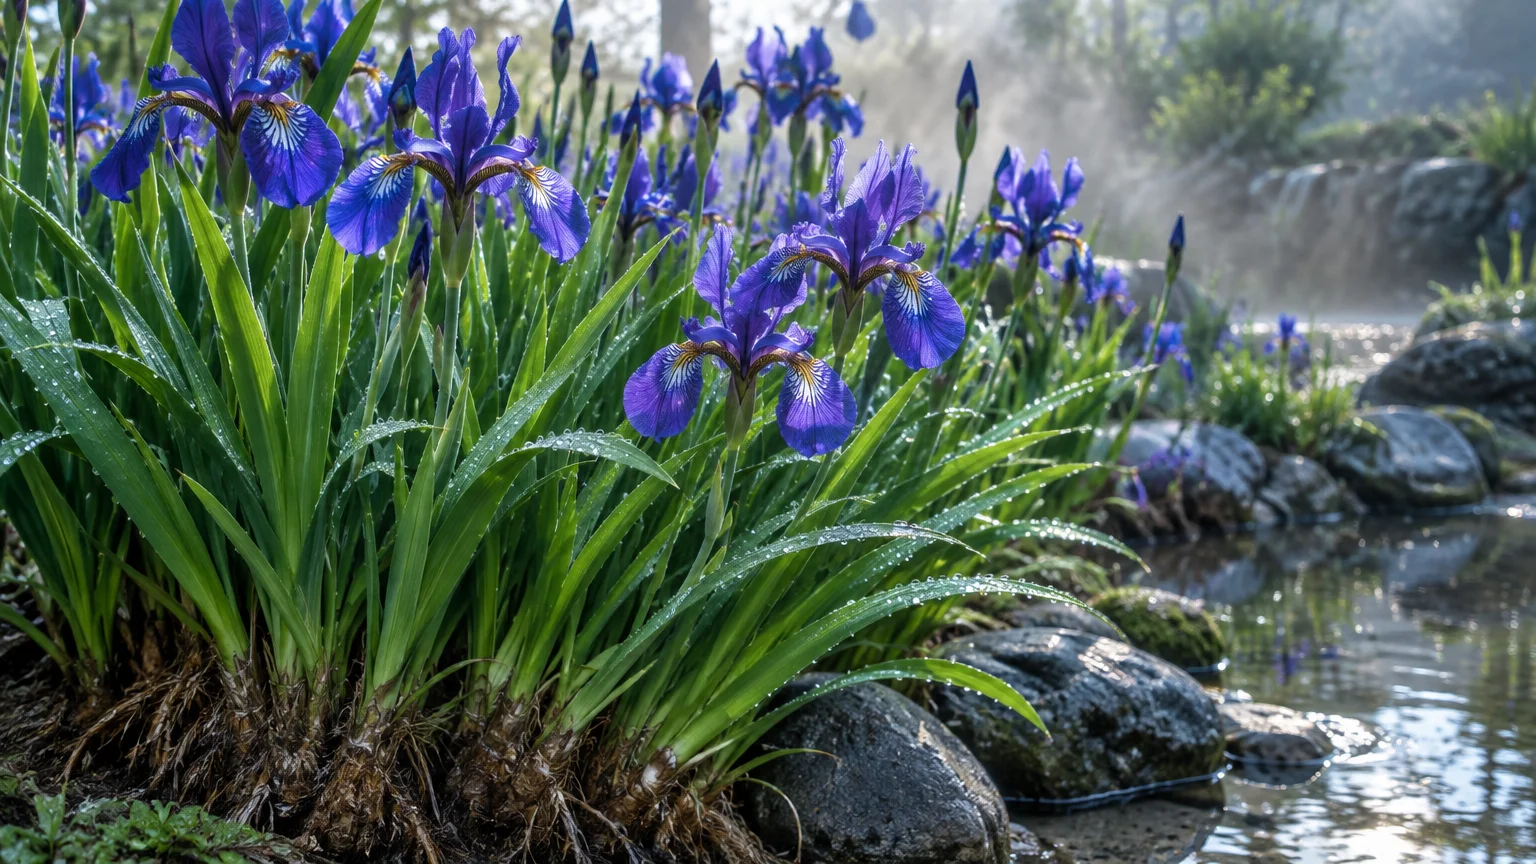
Siberian irises offer slender grass-like foliage and exquisite blossoms in shades of royal purple, blue, and crisp white. They naturalize gracefully into broad, stately clumps that enhance garden borders and pond margins.
Unlike bearded irises, Siberian varieties multiply through compact, tough underground rhizomes that form dense circular colonies. These expanding rhizomes interlock securely, creating an impenetrable barrier against weeds.
Plant your Siberian irises in sunny or partially shaded spots with damp, humus-rich soil. They appreciate slightly acidic ground and welcome regular moisture, especially during spring bloom development.
Divide mature clumps every four to five years when the center of the ring becomes woody or sparse. Use two back-to-back digging forks to pry the dense, fibrous root ball into manageable portions.
Replant outer divisions promptly and keep them well-watered until new green growth appears. These elegant perennials will reward your simple division work with dozens of graceful blooms each June.
Siberian irises resist deer and rodents, making them ideal for gardens near open woods or rural meadows. Pests avoid the tough, bitter foliage, allowing the plants to expand undisturbed.
Tip #8: Autumn Joy Stonecrop (Hylotelephium spectabile)
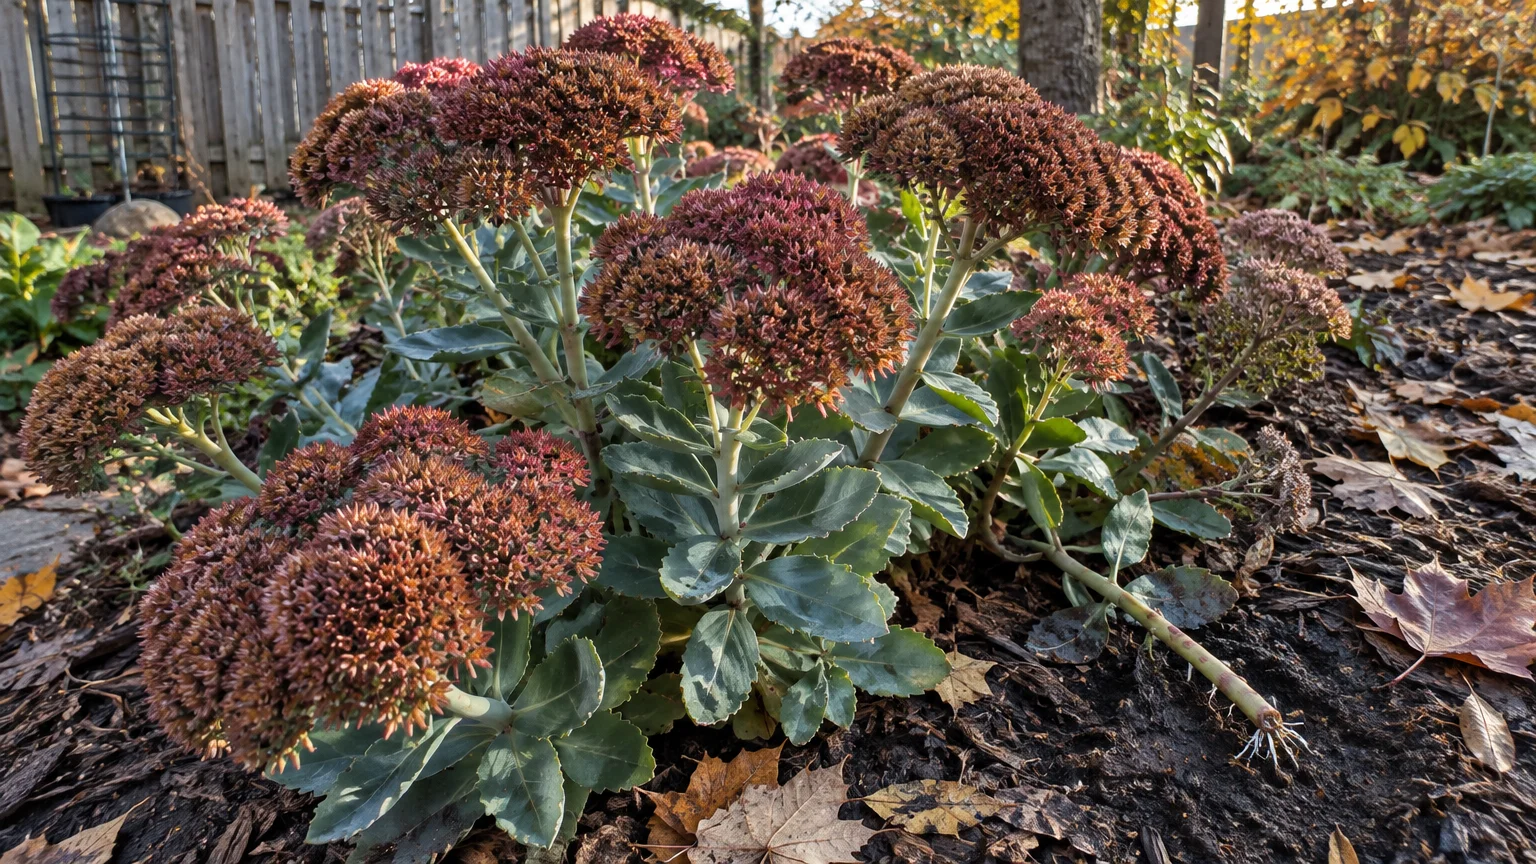
Autumn Joy stonecrop brings sculptured succulent leaves and broad flower heads that deepen from blush pink to rich copper. This drought-tolerant perennial multiplies effortlessly through expanding root crowns and self-rooting stem cuttings.
Sedums multiply underground as their root crowns broaden horizontally, sending up fresh leafy stems each spring. Additionally, any broken stem that falls onto damp garden soil can quickly strike roots and grow.
Provide full sun and sharply drained soil to prevent your sedum stems from becoming leggy or top-heavy. These succulents store moisture inside their fleshy leaves, allowing them to withstand weeks without supplemental watering.
Propagate extra plants in late spring by snapping off healthy three-inch stem tips. Insert those cuttings directly into moist garden soil, where they will root without rooting hormones in two weeks.
Divide large clumps in early spring just as cabbage-like rosettes emerge at the soil line. Slice the root ball into equal sections to expand your autumn garden display effortlessly.
The sturdy flower heads persist through winter snowfalls, providing valuable texture and food for visiting birds. Wait until late winter or early spring to prune the dried stalks back to ground level.
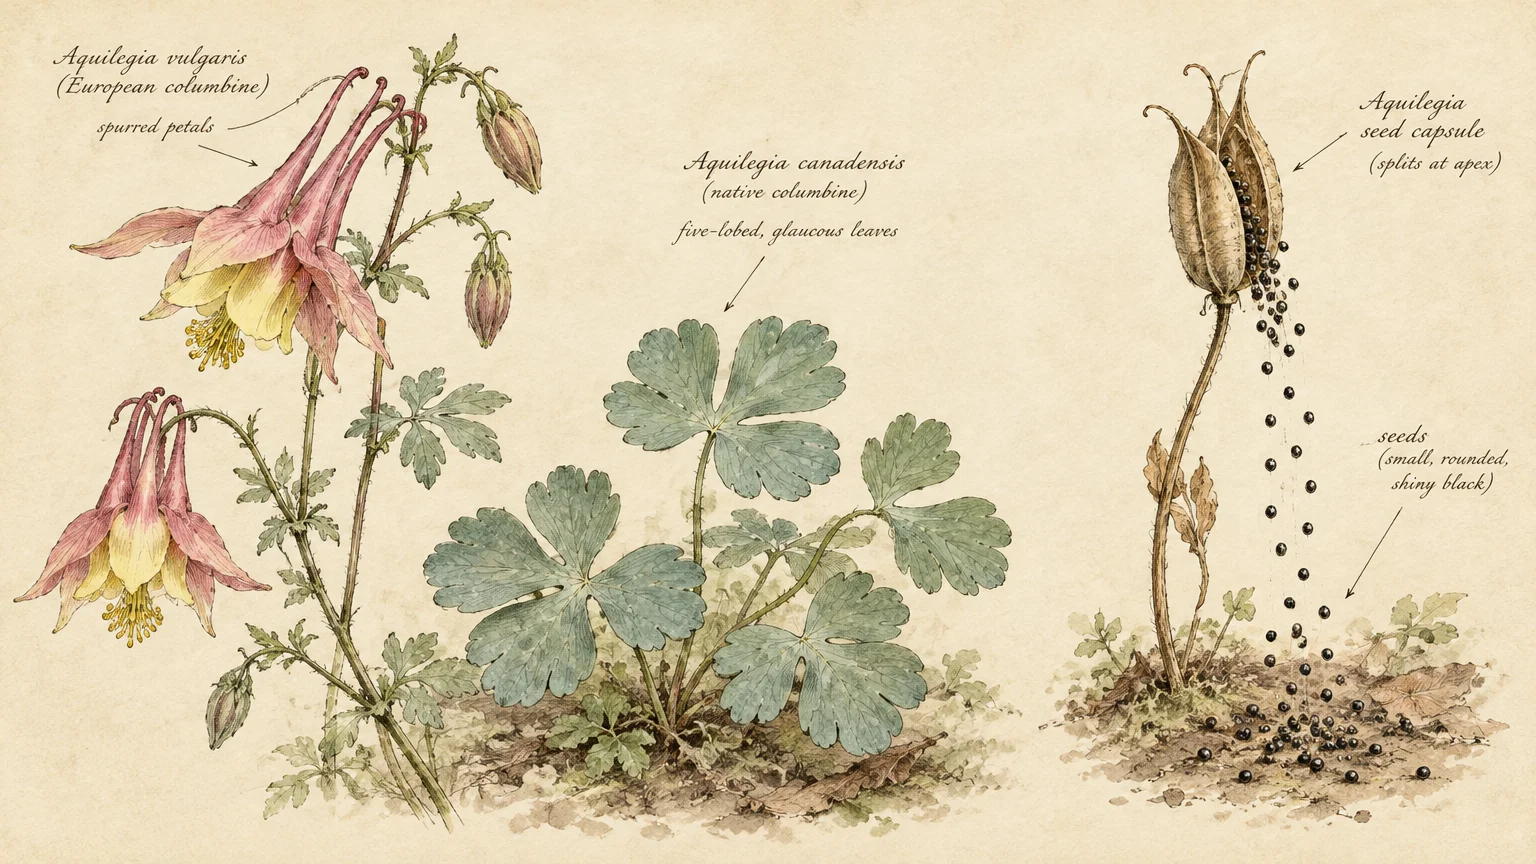
Tip #9: Columbine (Aquilegia)
Columbine charms gardeners with spurred, nodding flowers that float above delicate, clover-shaped foliage in mid-spring. This enchanting woodland flower naturalizes gently across shaded borders without ever turning into an aggressive nuisance.
Columbines are master self-seeders that produce glossy black seeds inside papery seed pods after blooming ends. When breezes shake the mature pods, seeds scatter across nearby soil and germinate after winter dormancy.
Plant columbine in partial shade with light, moist soil enriched with leafy leaf mold or garden compost. They perform exceptionally well beneath deciduous trees, soaking up early spring sun before tree leaves cast dense shade.
Allow the lantern-like seed pods to brown and crack open naturally on the stems. You can gently shake the pods over bare garden pockets where you desire fresh sweeps of whimsical color.
Columbines readily cross-pollinate, which means your self-sown seedlings often emerge in delightful surprise color combinations. Welcome these spontaneous color variations to give your garden beds a relaxed, cottage-style aesthetic.
While individual columbine crowns may decline after three to four years, new seedlings continuously replenish the colony. This continuous reproductive cycle ensures you never run out of blooming plants in your landscape.
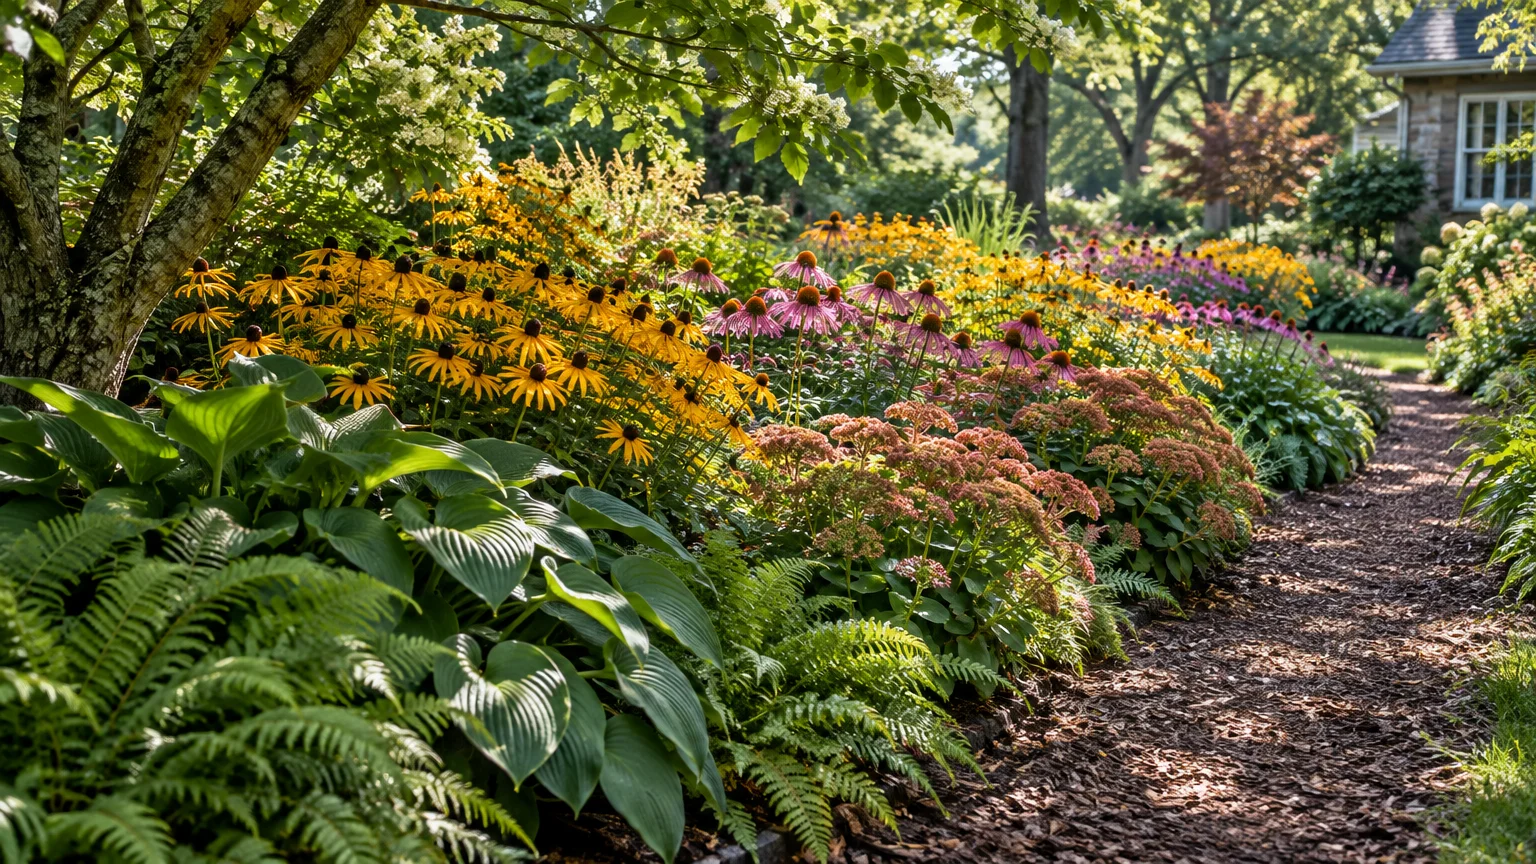
Putting It All Together: Enjoy Your Beautiful Garden
Gardening with self-spreading perennials saves you time, cuts landscaping costs, and fills your beds with abundant color. As these plants multiply, they weave together to create resilient, weed-suppressing plant communities.
Monitor your spreading beds each spring to decide which clumps require division or gentle thinning. You can relocate extra divisions to empty garden patches or swap them with fellow neighborhood plant enthusiasts.
Layering tall spreaders behind low creeping groundcovers creates depth, texture, and continuous visual interest from April through October. Healthy soil and proper sunlight will ensure your naturalizing plants flourish for years to come.
Take time to observe how each plant spreads across your microclimates, adjusting spacing as needed. Gardening becomes an exciting partnership with nature when you let vigorous perennials multiply on their own.
For region-specific advice, consult your local University Extension program (find yours via the USDA directory). For plant databases and inspiration, visit the Missouri Botanical Garden or the Royal Horticultural Society.
Frequently Asked Questions
How do perennials multiply on their own?
Perennials multiply primarily through three natural mechanisms: creeping underground rhizomes, horizontal aboveground stolons, and self-seeding. Clumping perennials expand their root crowns outward each season, creating dense clusters that gardeners can divide.
Self-seeding perennials drop fertile seeds directly onto surrounding soil each autumn. These seeds undergo cold stratification over winter and sprout into vigorous new seedlings when spring arrives.
When is the best time of year to divide multiplying perennials?
The general gardening rule is to divide spring-blooming perennials in late summer or early fall. Conversely, you should divide late-summer and autumn-flowering perennials in early spring as new shoots emerge.
Dividing plants while they are dormant or entering dormancy minimizes moisture stress on damaged root systems. Always water new divisions thoroughly until their feeder roots establish in the surrounding soil.
Will self-spreading perennials become invasive in my yard?
Vigorous self-spreading perennials can sometimes outgrow their allotted spaces if left unchecked for several seasons. However, the well-behaved perennials featured in this guide are easy to control through routine division and weeding.
Always research how specific plant varieties behave in your regional climate before planting them. If a plant spreads faster than desired, simply install physical root barriers or deadhead spent flowers.
How can I encourage my perennials to multiply faster?
You can encourage rapid multiplication by improving your soil texture with rich organic compost before planting. Loose, nutrient-rich soil allows underground rhizomes and spreading roots to expand without hitting compacted barriers.
Provide consistent moisture during the first growing season and apply a two-inch layer of organic mulch. Mulch retains soil moisture and protects shallow spreading stolons from harsh sun exposure.
Disclaimer: This article provides general gardening advice. Always consider your specific climate, soil conditions, and local pests, and follow safety guidelines when using gardening tools and products.