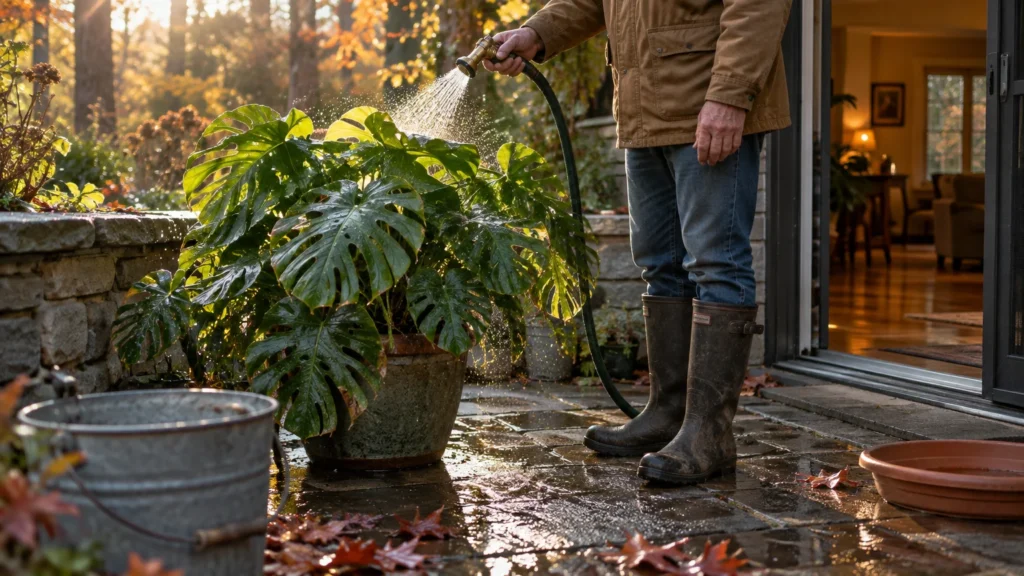
Discovering brown spots on leaves can feel alarming, but you can easily identify the culprit and restore your foliage to vibrant health. Quick diagnosis allows you to correct simple environmental mistakes before permanent damage sets in.
Most leaf blemishes stem from common routines like improper watering, intense sunlight, or mismanaged fertilizer applications. Understanding how these factors trigger stress gives you complete control over your garden’s recovery.
By learning the distinct signs of leaf damage, you will protect your favorite greenery and maintain flourishing plants year-round. Here are the seven most frequent mistakes that cause spotting and exactly how to fix them.
Tip #1: Overwatering and Suffocating the Roots
Pouring too much water into containers suffocates root systems by eliminating vital oxygen pockets within the soil. Without oxygen, roots decay rapidly and lose their ability to support the foliage above.
This root suffocation quickly triggers visible plant leaf problems across the entire canopy. You will often notice soft, dark brown or black spots spreading across the center of older leaves.
These damaged areas frequently develop bright yellow halos surrounding the necrotic brown tissue. In severe cases, the plant wilts even though the potting soil feels wet to the touch.
Recognizing early overwatering signs protects your collection from irreversible fungal root rot. When leaves feel limp and exhibit mushy brown patches, root health is rapidly deteriorating beneath the surface.
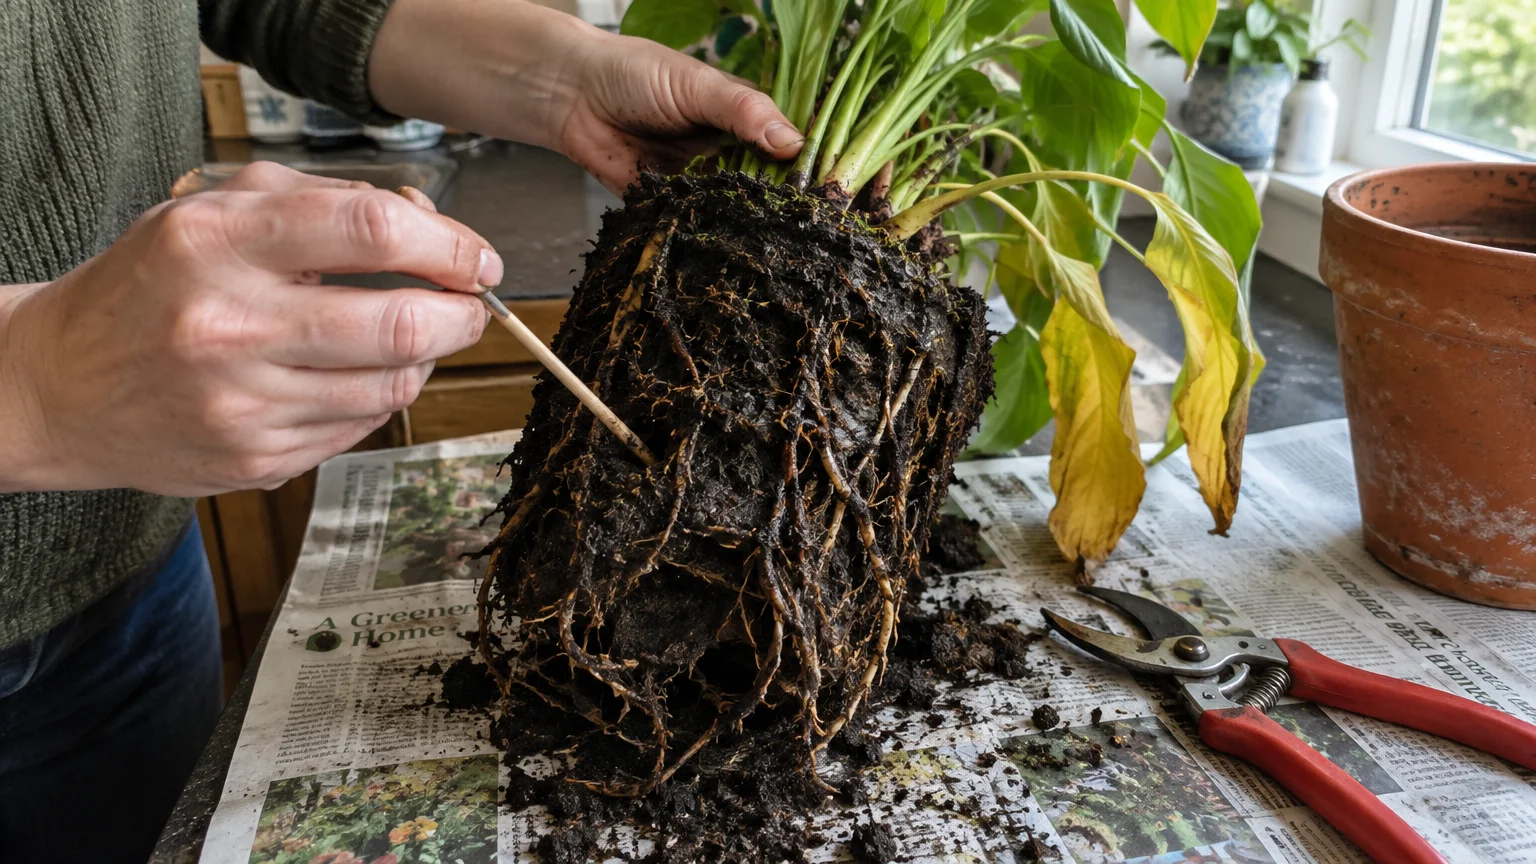
Always test moisture depth before grabbing your watering can. Insert a wooden skewer or your finger two inches into the potting medium to check for residual dampness.
Select containers equipped with drainage holes so excess water drains freely away from root systems. Empty collection saucers fifteen minutes after watering to prevent roots from sitting in stagnant pools.
Incorporate coarse perlite, pumice, or orchid bark into your potting soil to improve aeration. Porous soil mixtures ensure that roots receive fresh air even after a thorough saturation.
If the soil smells sour, gently unpot the plant to inspect the root ball. Trim away blackened, mushy roots using sterilized pruning shears before repotting into fresh, well-draining soil.
Tip #2: Underwatering and Severe Moisture Stress
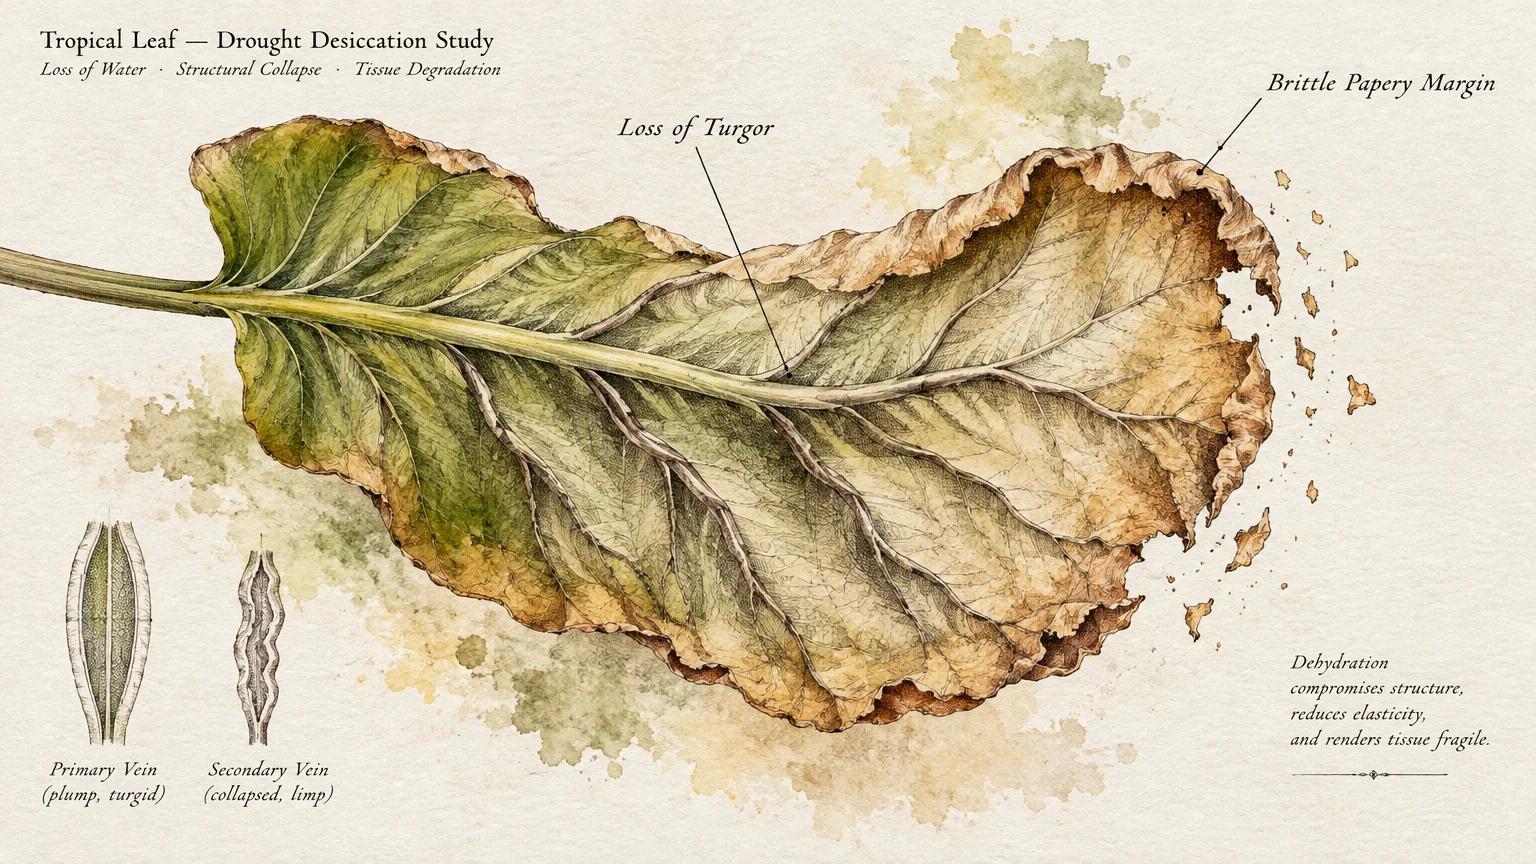
Underwatering deprives plant cells of the turgor pressure needed to maintain strong foliage structure. When roots run out of moisture, the plant sacrifices outer leaf edges to preserve its core.
This dehydration produces crisp brown spots on leaves that feel brittle and papery between your fingers. Unlike the soft patches caused by rot, underwatered foliage crumbles easily when gently touched.
Symptoms usually start along the leaf tips and outer margins before advancing inward toward central veins. You will also notice drooping stems, dull leaf coloring, and premature shedding of lower leaves.
To revive a thirsty specimen, soak the root zone thoroughly until water flows steadily from drainage openings. This deep soak guarantees that dry interior root pockets receive essential hydration.
Peat-based potting mixes often shrink and turn hydrophobic when left dry for too long. If water runs down the pot sides without sinking in, bottom-water your plant in a basin for twenty minutes.
Establish a consistent checking routine rather than relying on a rigid calendar schedule. Changes in seasonal temperatures, humidity levels, and plant growth rates constantly alter how fast soil dries.
Apply a two-inch layer of organic mulch across outdoor garden beds to shield topsoil from evaporation. Shredded hardwood or compost preserves consistent moisture levels and prevents severe hydration stress during warm weather.
Monitor porous terracotta pots closely because their breathable clay walls pull moisture from potting soil rapidly. Plants in terracotta often need more frequent watering than those in glazed or plastic containers.
Tip #3: Exposing Delicate Foliage to Direct Sun Scorch
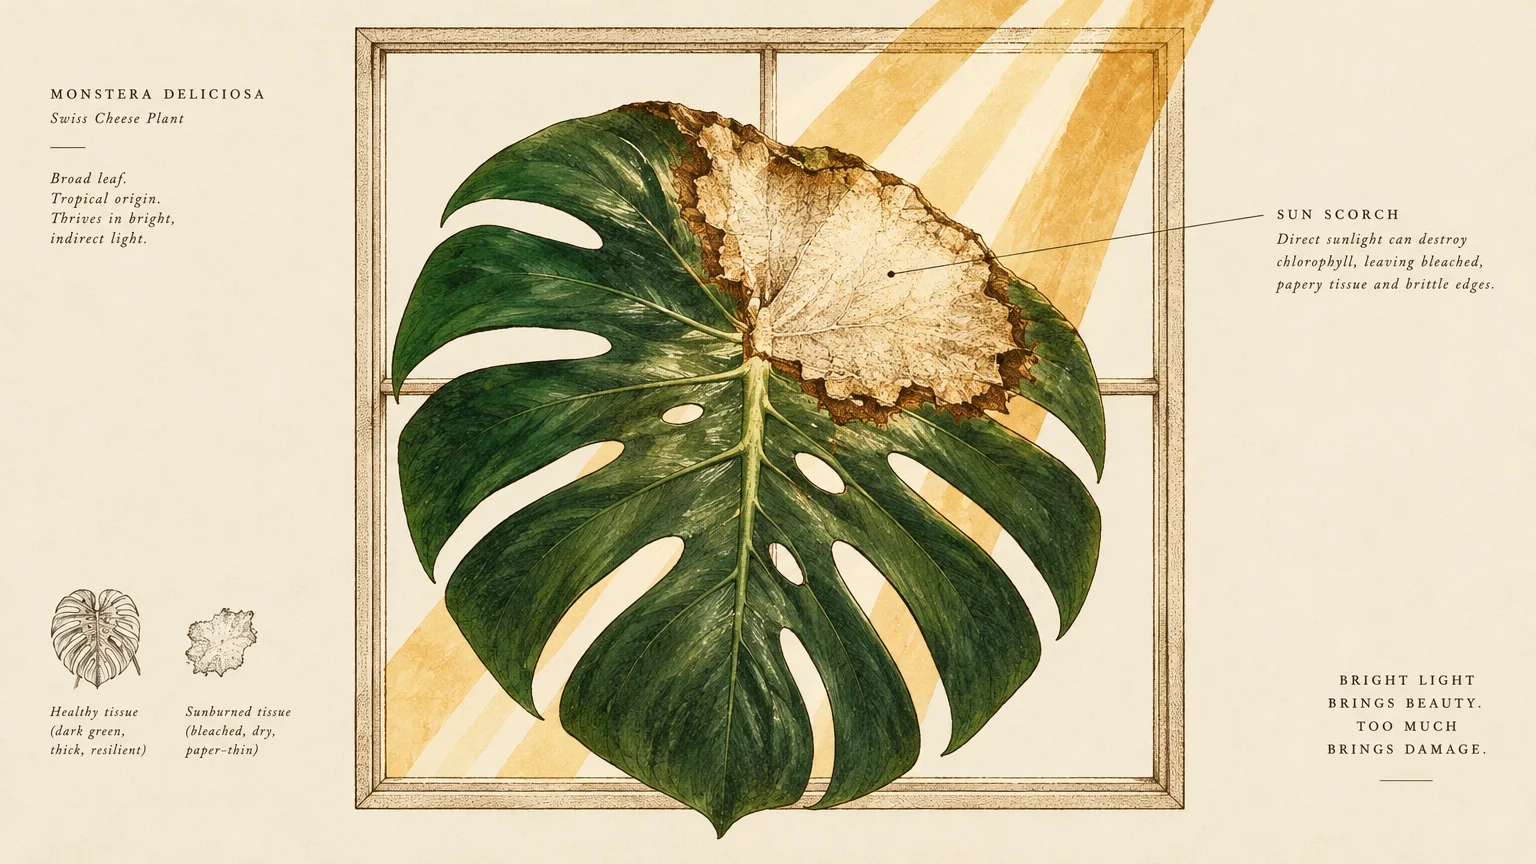
Placing low-light or shade-loving plants into intense afternoon sunlight causes severe leaf scorch. Excessive ultraviolet radiation destroys delicate chlorophyll molecules and overheats tender leaf tissues beyond their tolerance.
Sun scorch appears as bleached white, yellow, or light brown spots on leaves directly facing the sun. These scorched areas dry out quickly and turn into brittle, paper-thin patches.
Tender houseplants such as calatheas, ferns, and monsteras suffer quick foliar burns near unshaded south-facing windows. Outdoor plants experience similar distress when moved abruptly from sheltered nurseries into blazing garden beds.
Protect indoor specimens by hanging sheer curtains to filter harsh sun rays into soft, ambient illumination. You can also move sensitive plants several feet away from direct window exposure.
When transitioning indoor plants outside for the summer, harden them off gradually across two full weeks. Start them in full shade, slowly increasing their exposure to gentle morning sunlight each morning.
Install shade cloth over vulnerable outdoor beds during intense midsummer heat spells. This protective fabric lowers surface foliage temperatures while permitting enough sunlight for healthy photosynthetic activity.
Keep in mind that scorched leaf tissue cannot regenerate or regain its green coloration. Carefully prune away severely burned foliage so the plant can redirect vital energy toward fresh new shoots.
Check plant position throughout the year because the sun’s angle shifts noticeably with seasonal transitions. A safe spot in early spring may become dangerously bright by midsummer.
Tip #4: Over-Fertilizing and Salt Buildup
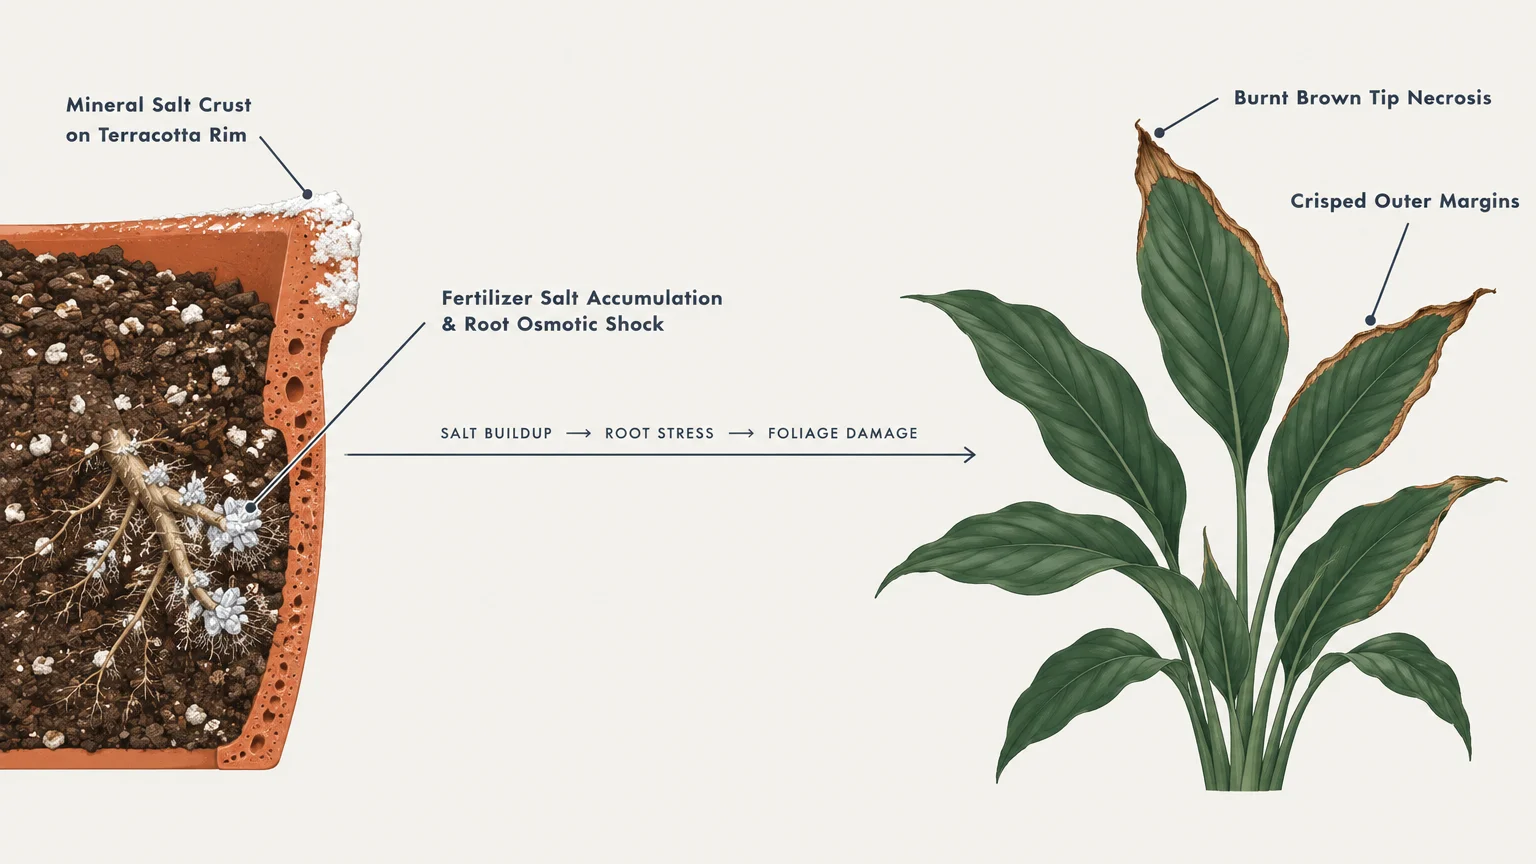
Applying excessive commercial fertilizer introduces dangerous concentrations of mineral salts into the root environment. These excess salts draw water away from roots through osmosis, effectively burning the plant from within.
Fertilizer burn causes scorched brown leaf margins and crispy tips that resemble heat damage. You might also notice a white, crusty mineral residue gathering on the topsoil or container edges.
Eager gardeners frequently commit these plant care mistakes while attempting to accelerate foliage growth. Unfortunately, concentrated nutrient solutions damage fragile feeder roots and hinder natural nutrient uptake.
If you suspect fertilizer excess, flush the potting medium with copious amounts of lukewarm water. Let the water run freely through drainage openings for several minutes to rinse out accumulated mineral salts.
Always dilute liquid plant foods to half or quarter strength before feeding your container plants. Supplying gentle nutrient concentrations supports steady growth without risking chemical damage to sensitive root tips.
Never apply fertilizer to bone-dry soil; always moisten the root zone with plain water first. Pre-watering creates a protective buffer that prevents concentrated fertilizer salts from scorching dry roots.
Halt all fertilizer applications during autumn and winter when plant growth slows naturally. Plants absorb minimal nutrients during periods of low light, making dormant feeding unnecessary and harmful.
Consider using slow-release organic fertilizers like worm castings or fish hydrolysate for sustained feeding. These natural options release nutrients gradually as soil microbes break them down, minimizing burn risks.
Tip #5: Wetting Foliage and Inviting Fungal Infections
Splashing water across foliage creates optimal conditions for pathogenic fungal and bacterial spores to thrive. When water sits on leaves for extended periods, pathogens easily breach natural plant defenses.
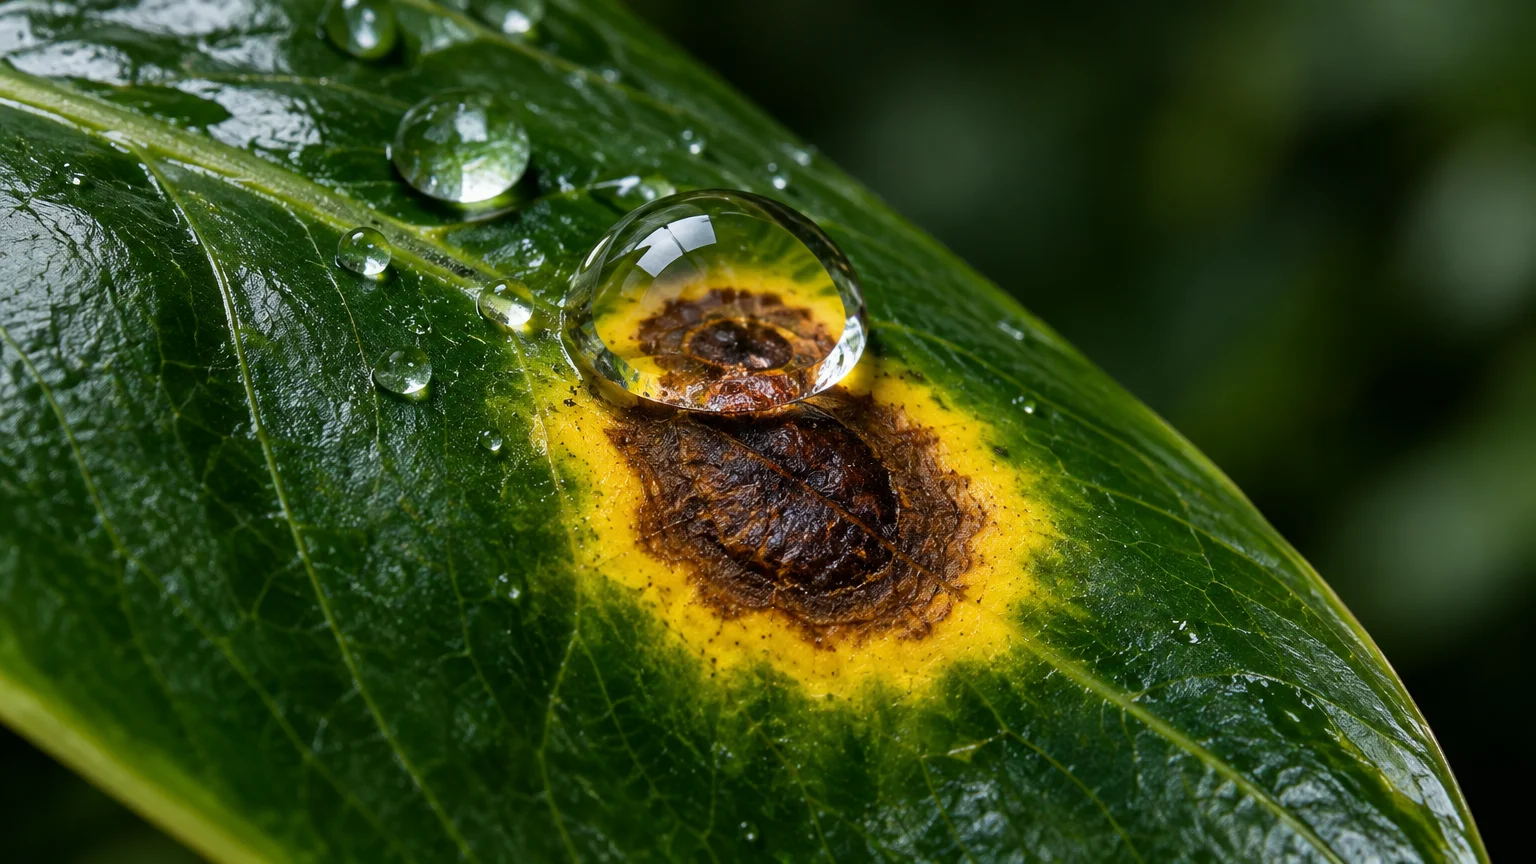
Fungal leaf spot diseases generate dark brown spots on leaves that expand gradually over several days. These lesions frequently feature concentric target-like rings surrounded by bright yellow margins.
Bacterial leaf spot produces angular, water-soaked brown lesions that often smell foul or feel slimy. Left unaddressed, multiple spots coalesce into large necrotic dead zones across the entire leaf blade.
Always apply water directly to the soil surface around the base of the plant. Keeping foliage dry deprives opportunistic fungal spores of the moisture they need to germinate and spread.
If you rely on outdoor sprinklers, water early in the morning rather than late at night. Morning sunlight quickly evaporates stray droplets from leaves before evening coolness encourages fungal incubation.
Space your garden plants properly to ensure adequate airflow through the entire canopy. Good air movement whisks away dampness and prevents microclimates of stagnant humidity around dense foliage.
Prune congested inner branches with sharp shears to open up the center of leafy specimens. Thinning overgrown stems improves light penetration and accelerates drying after rainfall.
Promptly remove and discard infected leaves showing active fungal spotting to prevent spores from traveling. Sanitize your cutting tools with isopropyl alcohol between every cut to avoid contaminating healthy plants.
Tip #6: Ignoring Low Indoor Humidity and Heating Drafts
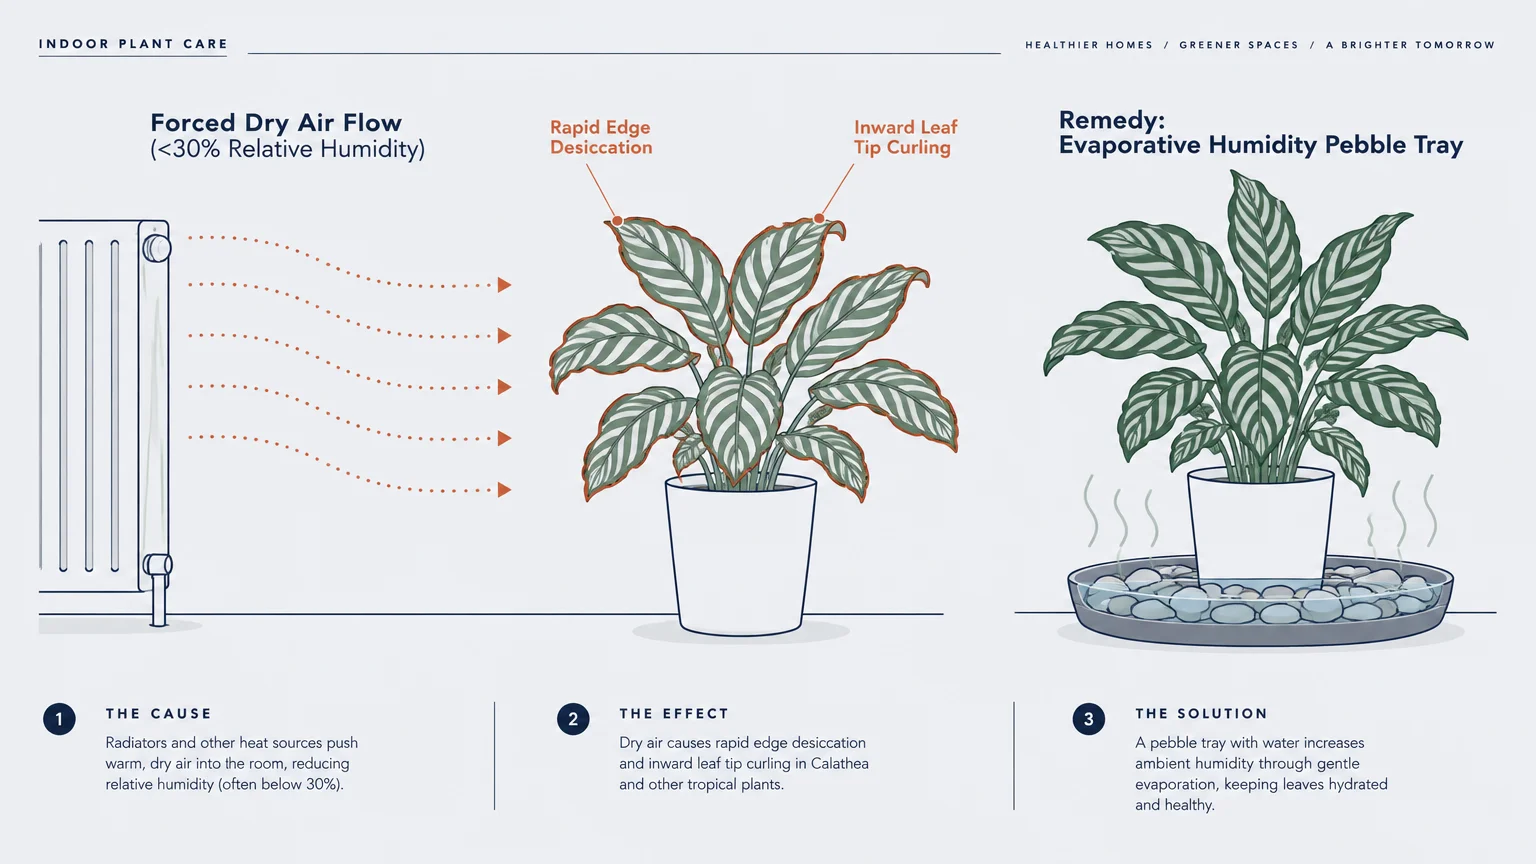
Running central heating units or air conditioners during extreme weather drives indoor humidity levels downward. Arid air accelerates foliar transpiration, forcing plants to expel water vapor faster than roots can replace it.
This atmospheric moisture deficit leads to dry, brown margins and crispy tips on thin-leaved tropical species. Over time, small necrotic spots develop across the leaf surface as delicate cellular walls collapse.
Houseplants placed near forced-air heating registers, radiators, or drafty exterior doors experience the fastest decline. Constant streams of dry air deplete foliar moisture reserves and trigger acute thermal stress.
Move delicate plants several feet away from drafty windows and heating vents to establish environmental stability. Maintaining steady temperatures allows foliage to retain moisture without enduring severe fluctuations.
Elevate local humidity levels by placing containers on shallow trays filled with pebbles and clean water. Evaporating water generates a humid envelope around the foliage without keeping the pot base wet.
Operating an ultrasonic room humidifier delivers consistent, measurable moisture for sensitive tropical collections. Aim to maintain relative indoor humidity levels between fifty and sixty percent for lush growth.
Group your houseplants together on plant stands to establish a shared, self-sustaining microclimate. Transpiration from adjacent leaves raises ambient moisture around the entire collection naturally.
Avoid misting your plants with handheld spray bottles as a primary method to boost humidity. Misting provides only fleeting relief and leaves wet droplets that may encourage fungal leaf infections.
Tip #7: Overlooking Sap-Sucking Insect Pests
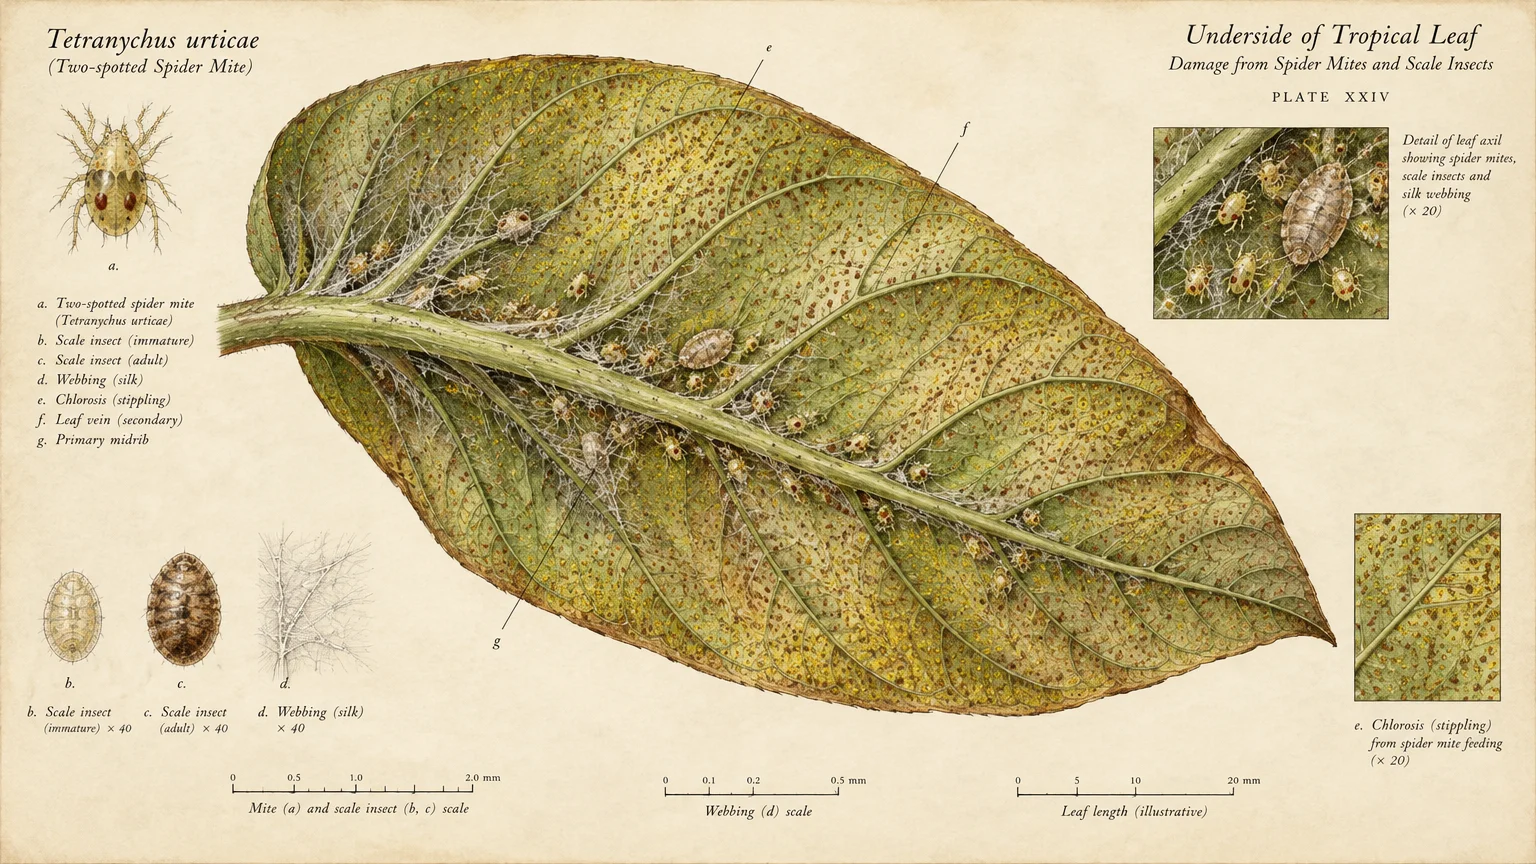
Tiny insect pests like spider mites, thrips, and scale insects feed silently on tender plant tissues. These pests pierce individual plant cells to extract vital fluids, causing localized tissue necrosis.
Pest damage typically begins as pale stippling before turning into patchy brown spots on leaves. Heavily infested foliage eventually twists, yellows, and drops prematurely from weakened stems.
Spider mites leave behind fine silk webbing across leaf axils and beneath foliage blades. Thrips produce tiny black fecal specks alongside irregular, silvery-brown feeding scars on leaf surfaces.
Examine the undersides of your plant leaves weekly using a ten-power hand lens. Catching pest populations early prevents minor colonies from erupting into devastating infestations across your garden.
Treat affected plants promptly by spraying foliage thoroughly with insecticidal soap or pure cold-pressed neem oil. Coat both the upper and lower leaf surfaces to smother active bugs and their eggs.
Isolate infested specimens in a separate room as soon as you detect insect activity. Keeping infected plants quarantined protects your broader indoor garden while you complete treatment cycles.
Wipe smooth plant leaves periodically with a damp cloth to remove accumulated dust and insects. Clean leaves perform photosynthesis more efficiently and discourage pests from setting up permanent colonies.
Introduce beneficial predatory insects like ladybugs or predatory mites into outdoor garden spaces. These natural predators control pest populations effectively without requiring synthetic chemical sprays.
Putting It All Together: Enjoy Your Beautiful Garden
Transforming spotted foliage into healthy, radiant greenery requires keen observation and prompt adjustments. Once you understand the specific causes behind leaf discoloration, troubleshooting plant issues becomes second nature.
Balance your watering routines carefully by checking soil dryness before adding moisture to containers. Providing appropriate drainage and airy soil mixes prevents the oxygen starvation that sparks root rot.
Protect your foliage from environmental extremes by buffering strong afternoon sun and elevating indoor humidity levels. Gentle light and moist air allow tropical plants to flourish without scorched margins.
Feed your plants conservatively and keep moisture off foliage to prevent salt burns and fungal outbreaks. Consistent, thoughtful care creates resilient plants that resist common pests and leaf spot diseases.
Celebrate every new leaf as proof of your growing gardening skill and attentive plant care. With these practical adjustments, your indoor and outdoor garden will thrive with vibrant, unblemished foliage.
Frequently Asked Questions
Can brown spots on leaves turn green again?
Dead brown leaf tissue cannot heal or turn green again once cellular necrosis occurs. The affected areas are permanently damaged and will remain brown for the lifespan of that leaf.
You can safely trim dead brown edges using sterile scissors to improve the plant’s visual appearance. Focus on correcting cultural care so future foliage emerges vibrant, healthy, and blemish-free.
Should you cut off leaves with brown spots?
You should remove leaves if fungal or bacterial disease causes more than half the leaf surface to turn brown. Removing severely damaged foliage eliminates active pathogen reservoirs and prevents infections from spreading.
If a leaf has only small brown tips from low humidity, leave it on the plant. Partially green leaves continue producing energy through photosynthesis to fuel healthy new growth.
How do you tell the difference between fungal leaf spots and sunburn?
Fungal spots typically display dark concentric rings, irregular shapes, and distinct yellow outer halos across the leaf. They often spread progressively to neighboring foliage, especially when leaves remain damp.
Sunburn manifests as dry, bleached patches localized only on foliage exposed directly to harsh light sources. Unlike fungal diseases, sunburn patches do not spread to sheltered leaves once light levels are corrected.
Does tap water cause brown tips on indoor plants?
Tap water treated with chlorine, chloramines, or high fluoride concentrations can cause brown leaf tips on sensitive species. Plants like spider plants, dracaenas, and calatheas are particularly prone to fluoride toxicity.
Switch to rainwater, distilled water, or reverse osmosis water if your tap water contains heavy mineral loads. Using pure water prevents toxic mineral accumulation in delicate leaf tips over time.
For region-specific advice, consult your local University Extension program (find yours via the USDA directory). For plant databases and inspiration, visit the Missouri Botanical Garden or the Royal Horticultural Society.
Disclaimer: This article provides general gardening advice; always consider your specific climate, soil conditions, and local pests. Follow safety guidelines when using gardening tools and products.